In my role as a graphic designer I deal with activities in the 2D (e.g. infographics) and 3D (product images) area. The creation of realistic 3D visualizations, e.g. for product or image pictures, is part of my tasks. As a studied product designer I have been working with 3D CAD & rendering programs since 2004.
In the past, I have worked with different hardware setups and, thus, have gained experiences with each of them. At Cloud&Heat I am processing my rendering jobs in the cloud for the first time. In this blog post I want to introduce four setups that can be used for rendering and share pros and cons for each of them. But what is rendering?
Definition: What is rendering?
To obtain a computer-generated image or video, you need a 3D CAD program to construct raw data, the so-called CAD model, and a rendering program or plug-in for a 3D CAD program that renders the CAD model. The raw data or CAD models are generated based on sketches or plastic models. The CAD raw data (computer-aided design / CAD model) allows an implementation for production on the one hand (creation of milling data, technical drawings, 3D printing etc.) and a realistic representation in space on the other (computer graphics / rendering).
Hardware requirements
When rendering, the most important thing is the time required and the hardware available. Here it is important, similar to the gaming sector, to have a very high performant system. The goal is always the same: to create an image or video in a certain time. This rendering process requires a lot of computing power to enable the rapid creation of an image or video. GPUs (Graphic Processing Unit – computing power for graphics) are used for this. These are special processors that can execute commands for fast editing and displaying of images and videos. Rendering videos requires even more power and takes much more time, as single and as many pictures as possible are rendered. These realistic images can be rendered in minutes, hours, days, or even weeks, depending on the 3D CAD model. For example, to create a 10s long animation video with 30 frames per second, a total of 300 single frames are needed. So, if one frame renders for 10 minutes, the complete process would take 50 hours in total!
Originally, conventional office computers were used to build optimized workstations with a lot of CPU and GPU power. On this workstations, 3D CAD raw data was designed and rendered to a realistic image. The acquisition of additional hardware, including graphics cards, increased the costs significantly. For the company, the expansion of the hardware, thus, resulted in higher operating and maintenance costs. Expanding the hardware is also time-consuming (dealing with common hardware systems) and costly (acquisition costs). For example, if a company has to purchase 10 new workstations (suitable for CAD + rendering), these are high costs that can run into four or five figures. Even setting up an own render farm is expensive and if rendering jobs are only necessary on a selective basis, companies should consider purchasing or outsourcing the rendering job to render farm providers.
From the workstation to the Cloud infrastructure
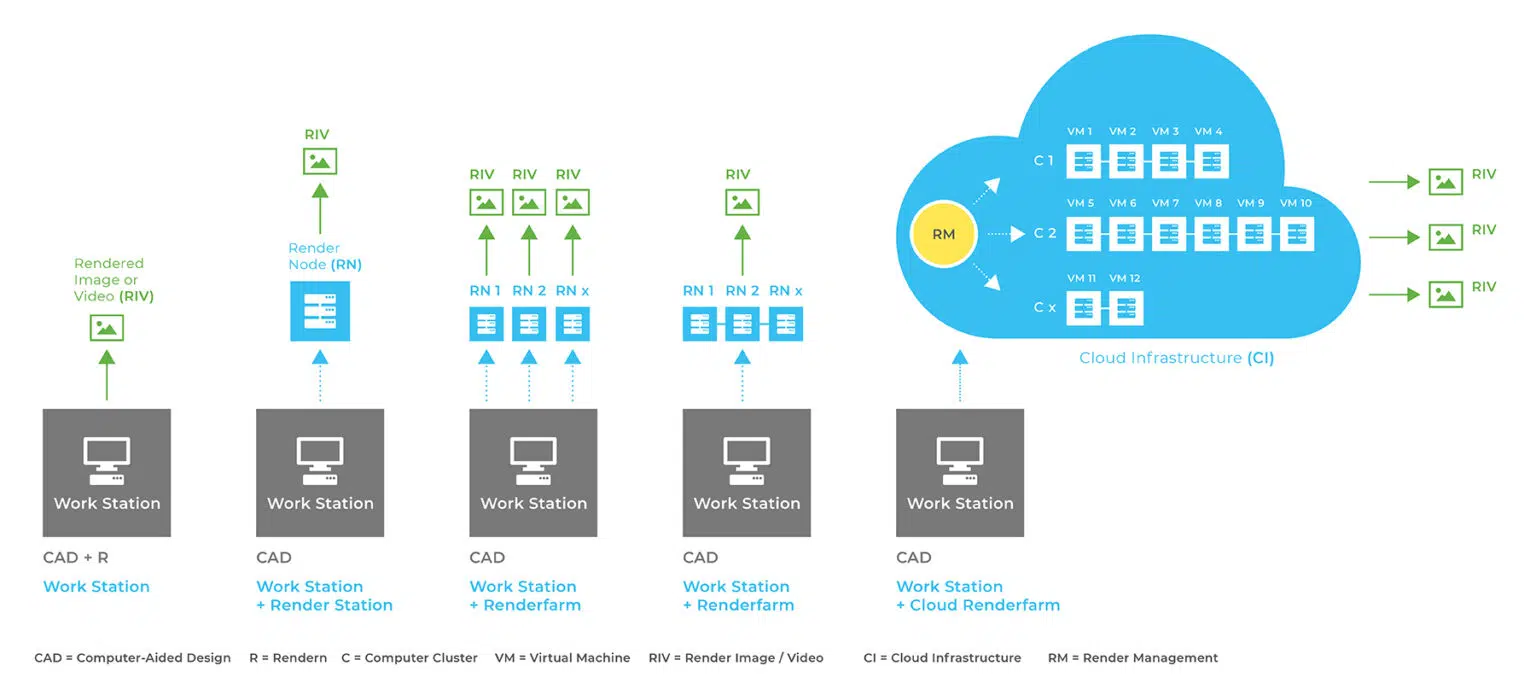
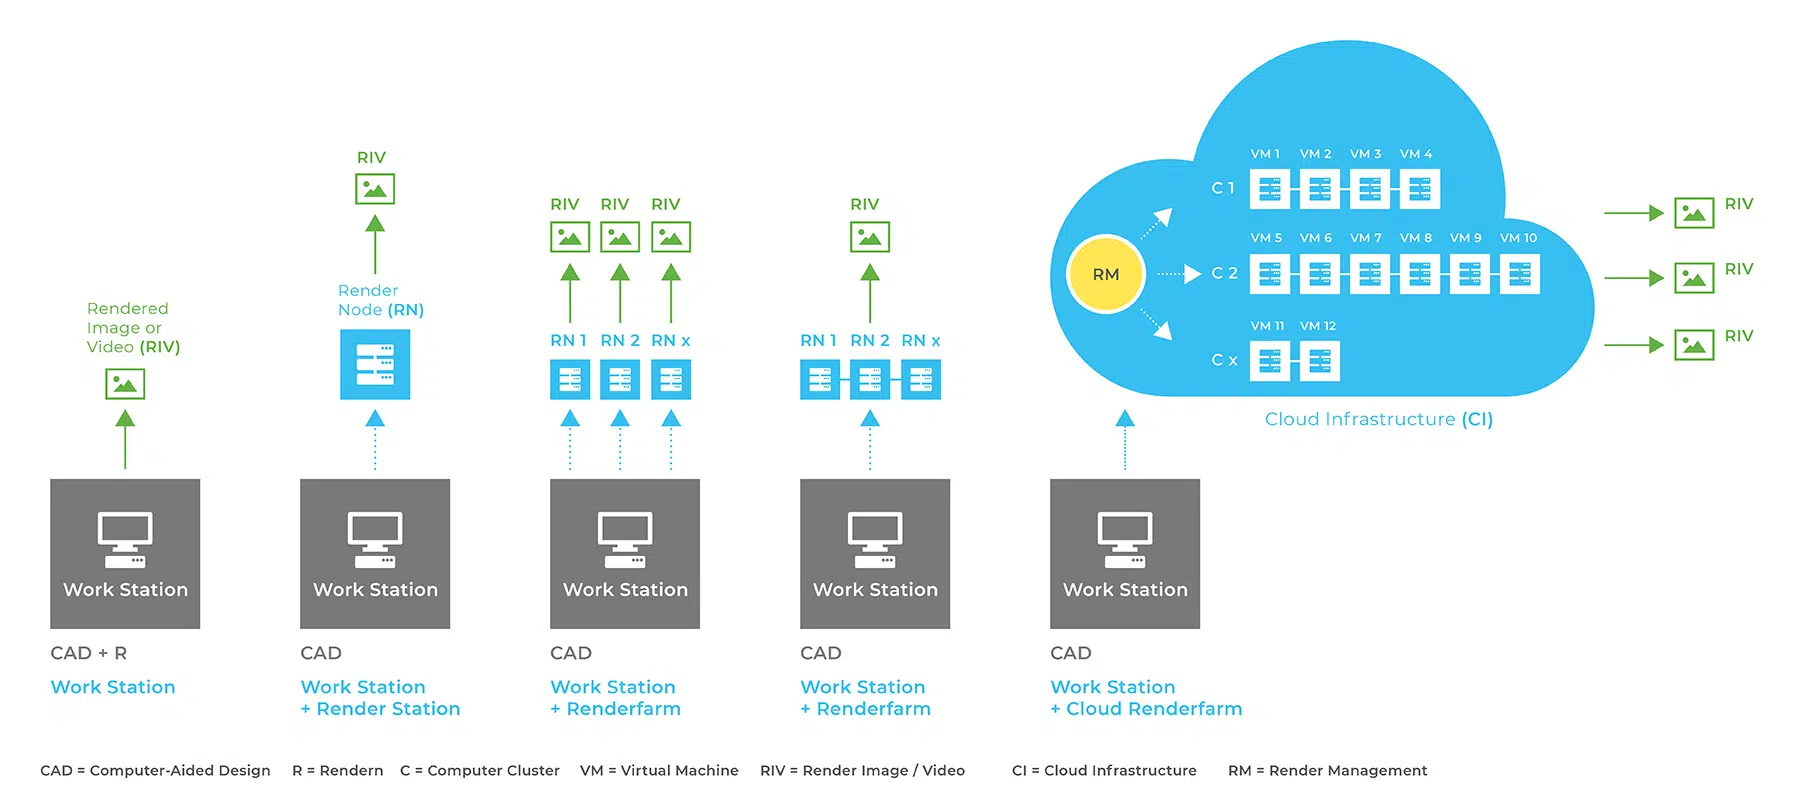
1. Workstation
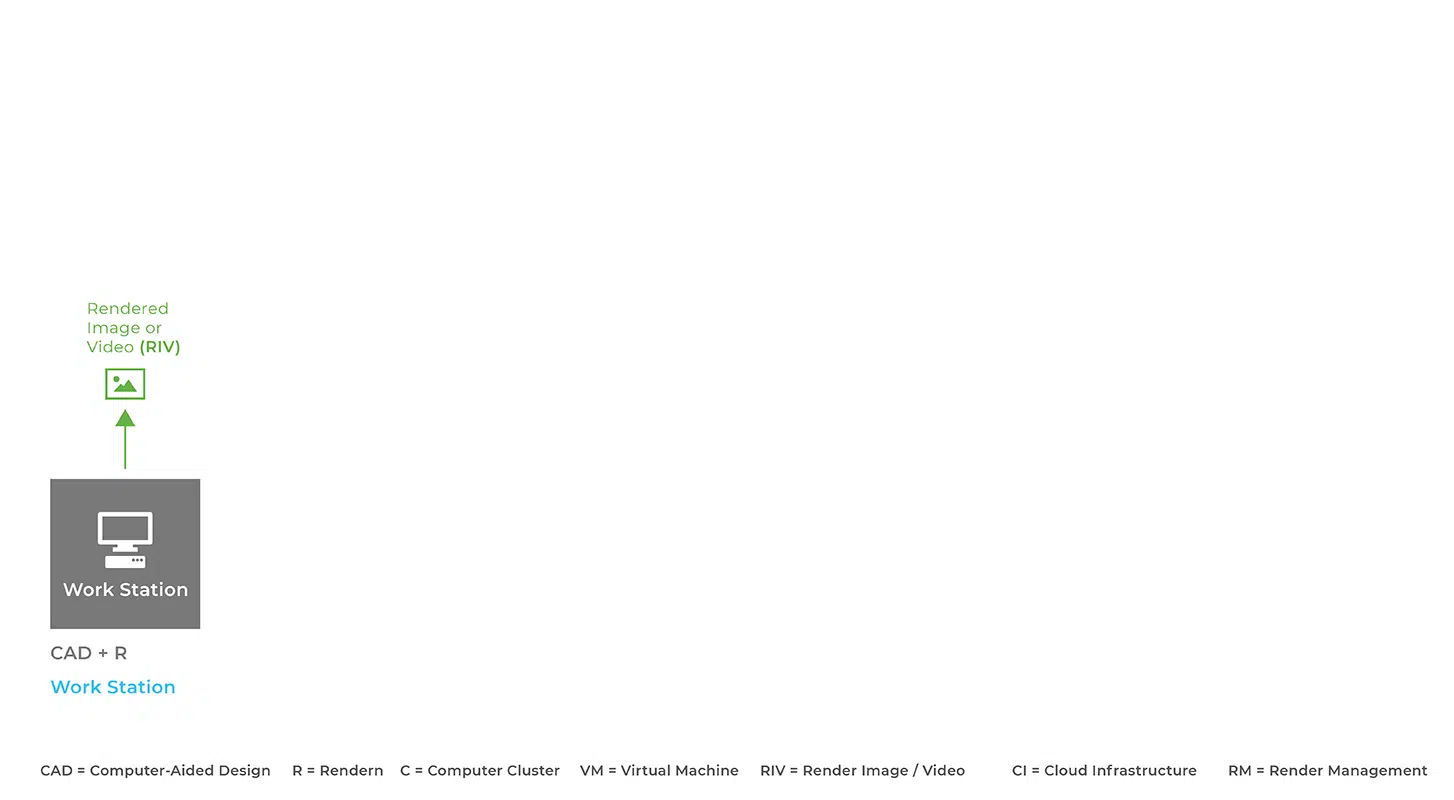
At the beginning of my active time as a graphic designer I worked on a conventional workstation – both privately and in various companies. Workstations are basically tailor-made office computers that are adapted to specific needs. A conventional office computer does not have the power to perform sophisticated calculations optimally. Later on, so-called render nodes (with a focus on powerful GPU graphics cards) were added, which are computers that are specially assembled and optimized for the render job (see paragraph “Workstation + Render Station”). The setup „workstation without render nodes or others“ still exists in this form today. The advantage of this is that conventional office computers have a low performance, which can be compensated by needs-driven composition. The disadvantage of this setup is that model calculations and rendering can only be performed on one computer that is hardly powerful in the drastic case. When a render job is executed it may result in bad overall performance, which makes simultaneous construction problematic.
2. Workstation + Render station
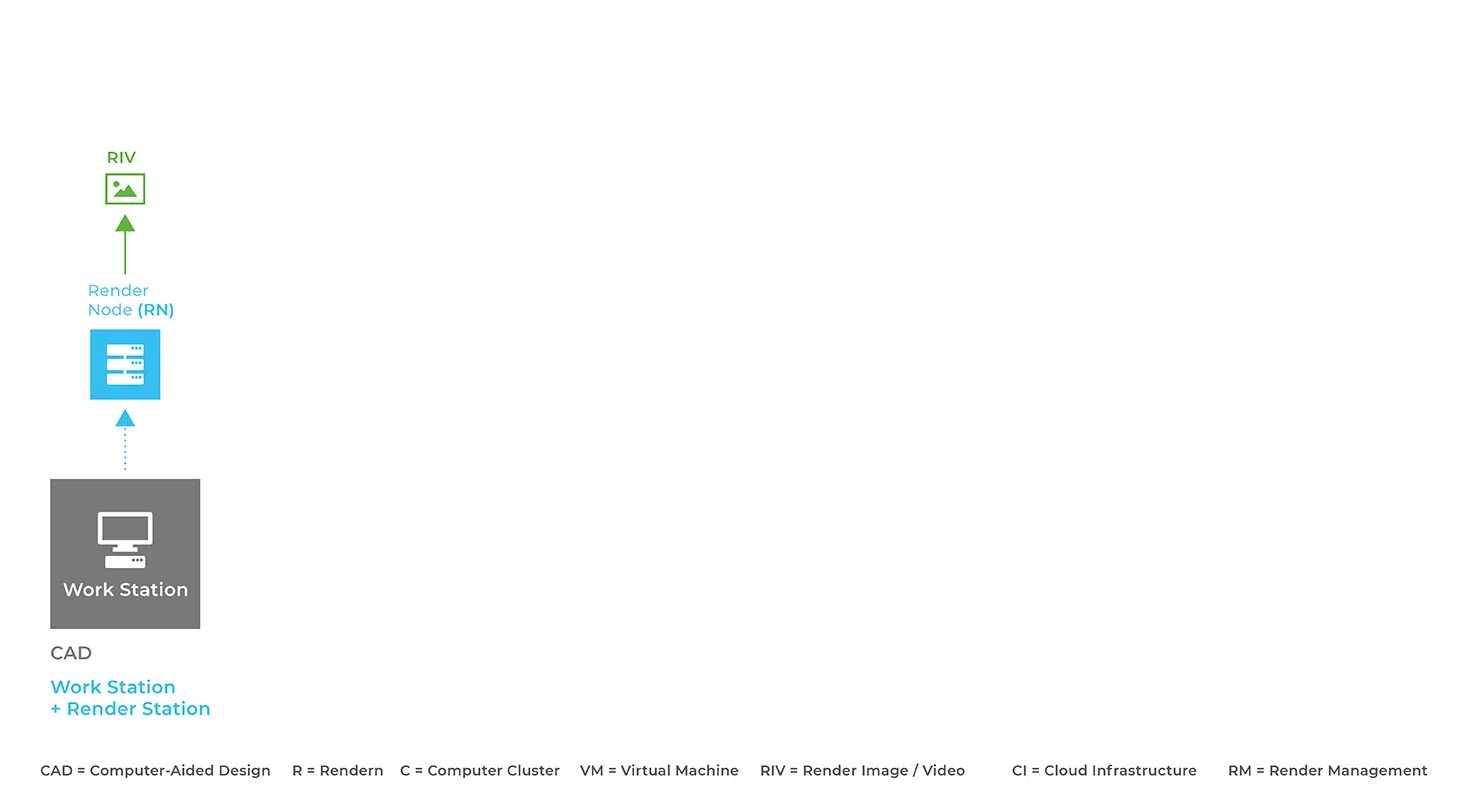
Another setup consists of dividing the workstation into two components. While one component is a classic workstation on which the CAD model is constructed based on powerful CPU and a lot of available storage space for large data, the second component is a computer with a lot of GPU power optimized for rendering (the so-called render node). Advantage: Render jobs can be executed on this node separately from the workstation. There is a render manager for the respective render program stored on the Render node. This is the simplest form of network configuration. Additional models can be constructed because rendering is done on a separate render node (Render Node). Disadvantage: The hardware performance is limited on the render node and even has to be extended for more demanding or larger jobs.
3. Workstation + Render farm
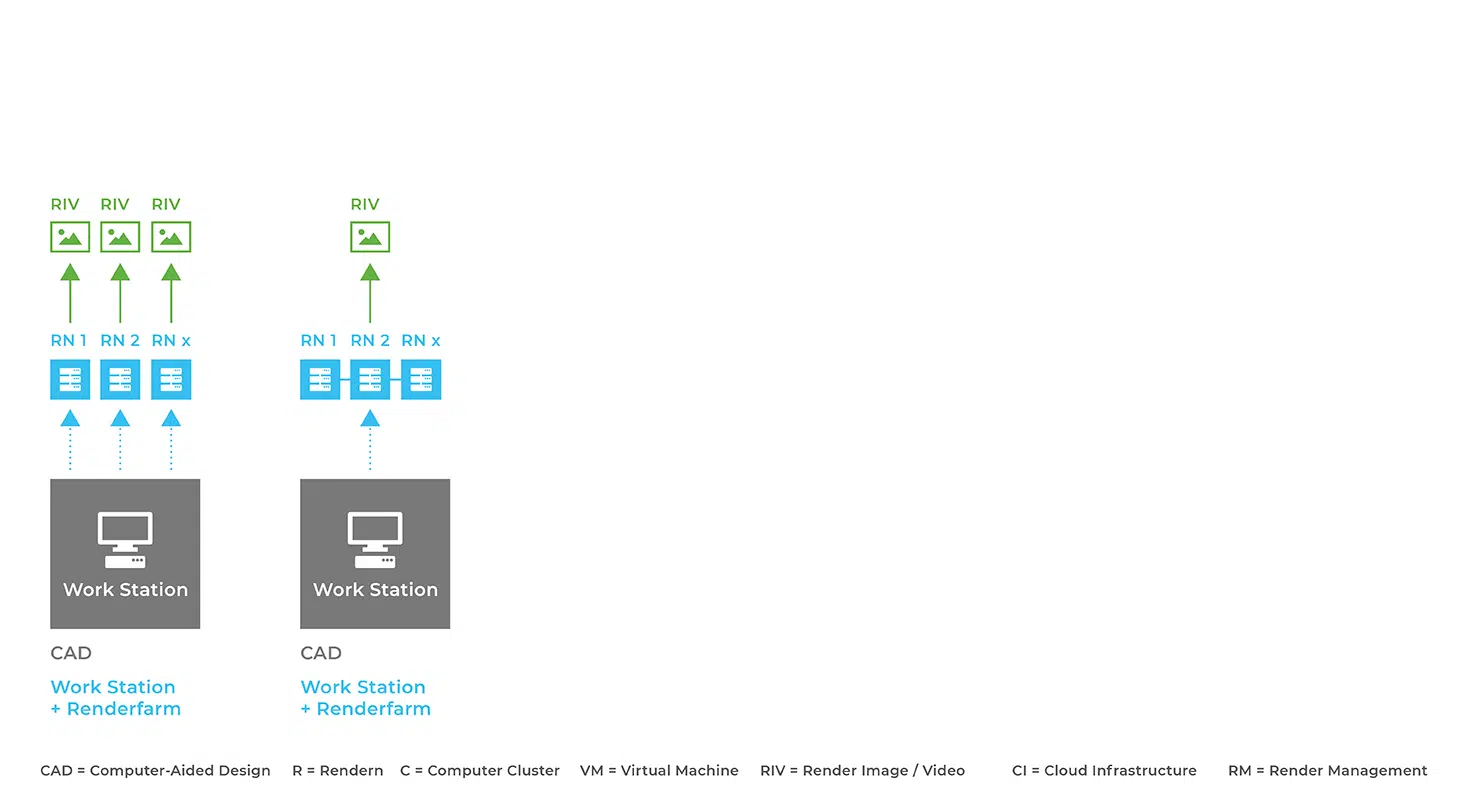
With this setup, the 3D raw data is constructed at the workstation, as before. The render station can be extended by several individual render stations. Thus, a render farm is created. The render farm consists of many individual render nodes. These individual computer nodes can be used either individually or in combination. This setup allows, as an alternative to the previous setup, an optimization and easy scaling of the requirements for the respective render job. For example, if you have a video, you can use many render nodes simultaneously. If you have many different images, you use many render nodes individually. This requires a render manager or a small program that belongs to the respective render program (e.g.: VRAY = VRAY Node). The program on the render node communicates with the workstation and accepts the render job. Advantage: If one of the nodes in a render farm fails, the render job is not interrupted, but the other remaining render nodes continue rendering whilst the defective node can be replaced or repaired. Depending on your needs, certain render nodes can be configured to form an even more powerful render farm or to many render farms. Disadvantage: The render farms are also limited and cannot be used flexibly among themselves. Scaling is only possible to a limited extent. The render farm has to be expanded if necessary.
4. Workstation + Cloud infrastructur
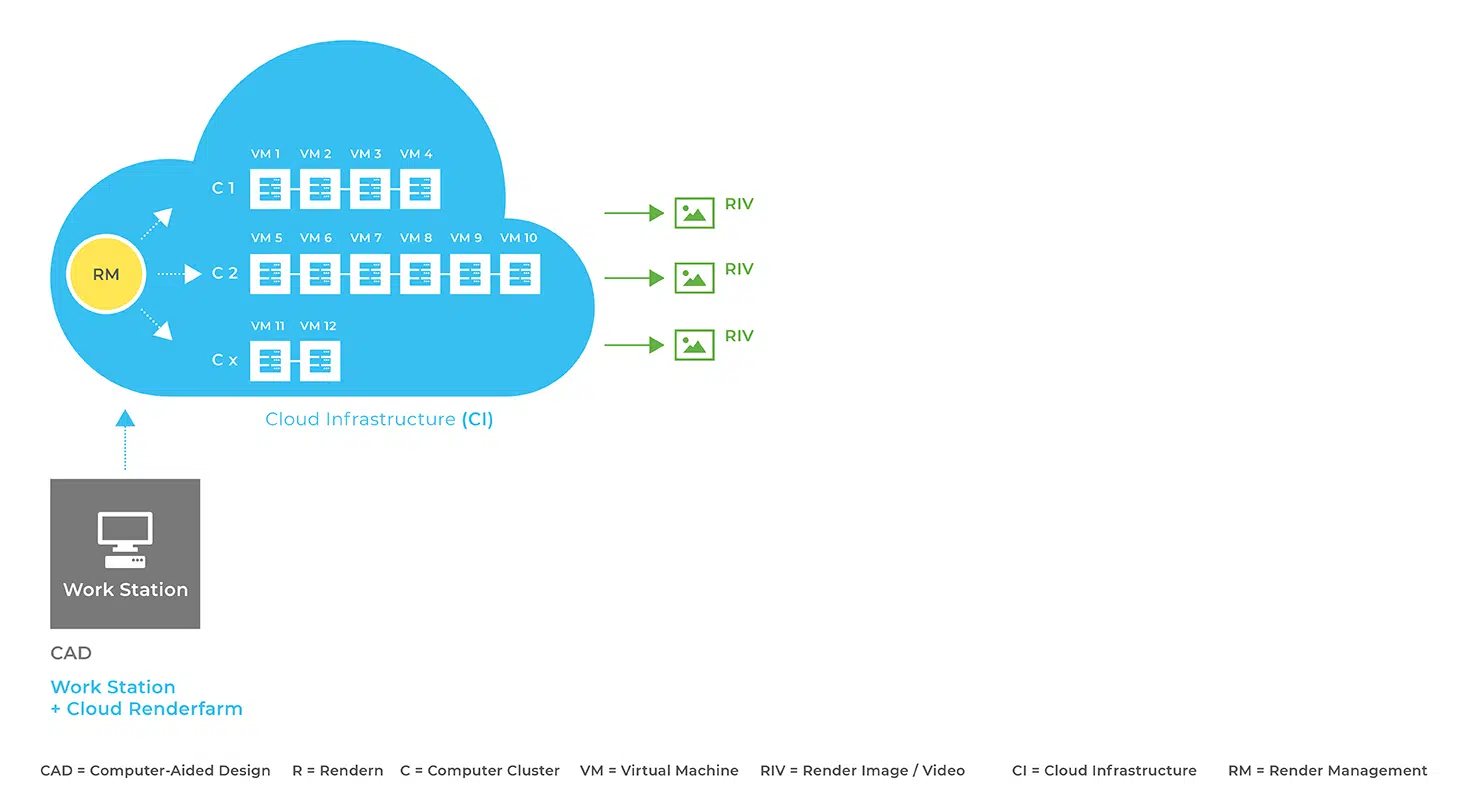
With this setup, 3D raw data can also be designed at the workstation. The difference to the classic render farm is that, roughly speaking, the render farm is located in a cloud infrastructure (CI). This infrastructure allows virtualization of the existing hardware so that customized configurations (network configurations to clusters (e.g. a cluster contains many virtual machines, C1 = VM1+VM2+VM4, C2 = VM5+VM6 …)) can be made. There is no need to purchase additional hardware, because it is just a few mouse clicks away, available in the cloud infrastructure. This requires a more powerful Render Manager (RM), which orchestrates the jobs to be processed. Depending on the job volume, the infrastructure can be scaled up or down and billed to the second. Once created, the VMs can be stored as an image in the cloud and can be set up again at any time if required. Furthermore, many more VMs can be created from an image and connected to form a cluster. This saves acquisition and maintenance costs and any number of render jobs can be executed simultaneously.
How can I build my render setup in the cloud?
The use of the cloud infrastructure is simple and sustainable. All you need to do is select a suitable standard image (e.g. Windows 10 Pro + specific hardware configuration). As usual, the already existing rendering program is installed and you can immediately start working with the system. Many providers of 3D software have cloud licenses, which are active where work is being done. Often no extra software needs to be purchased to work in the cloud. When the job is finished, you create an image of the VM (e.g. VM1) and can later boot the image in the cloud at any time. Afterwards you find everything as with the last job. Many rendering agencies have a high demand on computing power. The cloud approach prevents expensive hardware from going idle in times when no one is working on it.
Clonclusion
Nowadays, as a user I have at least these four presented setups to choose from, which can be purchased or, in the case of the cloud, rented as needed. This selection provides a high degree of flexibility. Depending on the render case, each of these setups has its right to exist. When selecting, it must be decided on a case-by-case basis which setup fits best and fulfills the render case most efficiently. From my point of view, the cloud offers the greatest added value because virtualization allows me to quickly determine suitable configurations and run many jobs simultaneously without having to worry about hardware, its maintenance and monitoring. I can use my workstation for construction as usual and simply move the rendering to the cloud.


