
Ansible is an automation engine that offers a simple client-less solution for managing server configuration and application deployment using an SSH connection. With Ansible, one is able to automate repetitive tasks in the OpenStack based Cloud and, thus, save time and increase the quality and reliability of the service. This tutorial will present a step-by-step guide on how to begin configuring your OpenStack VMs with Ansible. Throughout this tutorial, we will provide a hands-on experience of the fundamental parts of Ansible and show how to automate the configuration of Apache webserver and the transfer of template files.
Prerequisites
To follow this tutorial, we expect you to have installed Ansible. If you have not done it yet, you can find the install guide here or install Ansible with the following command:
$ sudo pip install ansible
Moreover, please launch two Ubuntu 16.04 instances and attach Floating IPs to them. In this article, one VM will be called dev, the other one prod. The VMs should have the SSH(22) and HTTP(80) ports opened via Security Groups and besides, the SSH keys to this VMs should be added to enable the communication via SSH. Finally, make sure that python 2.7 is present on the VMs (usually in /usr/bin) or install it with the following commands on both VMs:
$ ssh ubuntu@ip_addr
$ sudo apt-get install python
First steps with Ansible
Inventory
To begin orchestrating with Ansible, let’s first define the servers which we want to orchestrate. We can do so in Inventories. Let’s create an inventory file called hosts in your projects’ folder where we specify the access to our VMs:
[dev]
87.190.237.31
[prod]
87.190.237.17
The inventory file defines two groups — dev and prod — containing VMs defined by their Floating IP addresses. The IP address serves both as a name of the host in Ansible and as an address of the actual host server. This inventory file presents an elementary set-up of the hosts. With such a content, we can target hosts in each group — that is often all we expect.
Besides the IP address where to access the host, there are other options to specify more details concerning the servers. The SSH connection is targeting the TCP port 22 by default, but we can also specify the port ourselves with ansible_port=. To specify the user to connect to, we can use ansible_user=. Otherwise, we would have to specify it when running the Ansible commands. By using the presented variables, let’s update the hosts file and set-up the same hosts in a more descriptive form:
[dev]my_host_dev ansible_port=22 ansible_host=87.190.237.31 ansible_user=ubuntu [prod] my_host_prod ansible_port=22 ansible_host=87.190.237.17 ansible_user=ubuntu
Ad-Hoc Commands
The fastest and easiest way of how to begin with Ansible are the Ad-Hoc commands via the ansible CLI. Nevertheless, before starting with Ansible commands, make sure that the SSH keys to the VMs are added to your SSH agent (or add them by typing $ ssh-add /path/to/ssh_key). To try out the Ad-Hoc commands and also to ensure that the hosts specified in the Inventory are responding, let’s ping them:
$ ansible all -i hosts -u ubuntu -m ping
my_host_dev | SUCCESS => {
"changed": false,
"ping": "pong"
}
my_host_prod | SUCCESS => {
"changed": false,
"ping": "pong"
}
Now have a look at the ansible command we just executed. The all specifies the target group — all groups of hosts (prod and dev). The -i hosts specifies the inventory file name — hosts in the current working directory. The -u ubuntu specifies the user for the SSH connection. It can also be omitted here because it is already defined in the inventory file. Finally, -m ping defines the module (ping) to be executed. The output shows that both hosts — my_host_dev and my_host_prod — are responding to the ping over Ansible.
Although the Ansible Ad-Hoc commands enable an easy way to execute the Ansible modules, it lacks the advantage of Playbooks — repeatability. Since it is performed in bash, the commands do not get stored and therefore it is mainly used for one-time use or playing around, not for the usual configuration management.
Playbooks
Set up Apache Webserver
Now, after we found out that the hosts are responding, let’s automate installing Apache webserver on the VMs. To do that, we will use Playbooks. They are written in YAML(YAML Ain’t Markup Language) which is a data serialization language used for defining the configuration of the hosts. To define the Playbook, create a file called webserver.yaml with the following content:
- hosts: all
user: ubuntu
become: true
tasks:
- name: Install the latest version of Apache
apt:
name: apache2
state: latest
update_cache: yes
- name: Restart Apache webserver
service:
name: apache2
state: restarted
The file defines the target group to all hosts of the inventory file. The user for the SSH connection is ubuntu and the tasks specified further will be performed as root (become: true). There are two tasks to be performed — installing the latest version of and restarting the apache2 webserver. The installation part defines the apt package (apache2) to be installed in the latest version and also includes updating the apt cache. The restarting part ensures that the service called apache2 will be restarted.
Now, let’s apply the Playbook webserver.yaml on the Inventory hosts. We can do so with the ansible-playbook command:
$ ansible-playbook -i hosts webserver.yaml
PLAY [all] *********************************************************************
TASK [setup] *******************************************************************
ok: [my_host_dev]
ok: [my_host_prod]
TASK [Install the latest version of Apache] ************************************
ok: [my_host_dev]
ok: [my_host_prod]
TASK [Restart Apache webserver] ************************************************
changed: [my_host_dev]
changed: [my_host_prod]
PLAY RECAP *********************************************************************
my_host_dev                : ok=3    changed=2    unreachable=0    failed=0
my_host_prod               : ok=3    changed=2    unreachable=0    failed=0
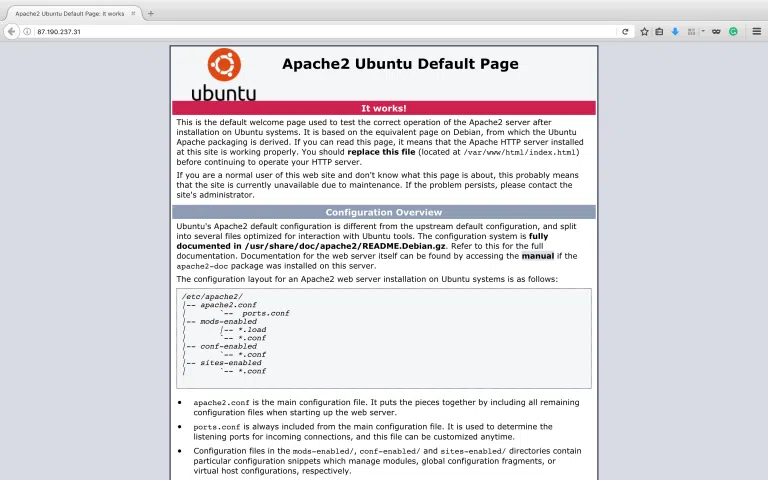
The ansible-playbook applied the Playbook webserver.yaml to Inventory hosts containing the two hosts we defined in groups dev and prod. In the output, we can see the performed tasks as defined in the Playbook and its state for the particular hosts. After performing those tasks, the Apache webserver should be running. Let’s check it by typing the IP to the browser.
Place our own customized index.html
Of course, the default index.html is rarely a content we want to expose. To automate replacing the original Apache2 welcome page with our own content, we have to be able to automate transferring files to the VMs. Therefore, the next Playbook will ensure exposing our own index.html on the server. The transfer will be done with the help of template module that manages uploading of the chosen file and enables Jinja2 templating on top of that. Jinja2 enables simple templating to dynamically generate custom content out of templates.
Before writing the Playbook itself, let’s specify the new index.html page template. We can write something fairly simple enabling us to see the replaced index page with our content:
<html>
<title>
Created with Ansible template module
</title>
<body>
<h3>This is a welcome page on my OpenStack VM "{{ ansible_hostname }}" created from a Jinja template!</h3>
</body>
</html>
The template is a standard HTML file with a placeholder for the hostname that should be replaced by the Jinja2 templating system. To transfer the template from your harddrive to the VM, create a Playbook copy_file.yaml:
- hosts: all
name: Transfer index.html to the Webserver
user: ubuntu
become: true  #for writing to /var/www
tasks:
- template:
src: path/to/index.html
dest: /var/www/html/index.html
owner: root
group: root
mode: 0644
backup: yes
The task template specifies the source path to copy from and the destination on the host. Moreover, you can specify the owner, group and access rights for the newly created file on the VM. The last line determines that a backup file will be created if a file already exists at the given location so that the original file will not be lost.
Now let’s execute this Playbook:
$ ansible-playbook -i hosts copy_file.yaml
Once the execution has finished, type the IP addresses of both VMs to your browser again and you will see the new index.html pages generated from the template we uploaded. Depending on the VM, the template exposes content such as “This is a welcome page on my OpenStack VM “dev” created from a Jinja template!” for dev VM.
Should you prefer to only copy the files and not applying the Jinja2 templating system, there is also a module called copy that works on a similar basis but only copies the specified files.
Sum it all up
So far, we have managed to ensure a running webserver on our VMs and to upload the index.html template file to the VMs. We can perform both (or possibly more) steps in one command. That will be ensured by a new Playbook webserver_with_index_html.yaml:
- include: webserver.yaml
- include: copy_file.yaml
The Playbook specifies that the Playbooks we have defined before (webserver.yaml and copy_file.yaml) will be executed. Now run that Playbook:
$ ansible-playbook -i hosts webserver_with_index_html.yaml
PLAY [all] *********************************************************************
TASK [setup] *******************************************************************
ok: [my_host_dev]
ok: [my_host_prod]
TASK [Install the latest version of Apache] ************************************
ok: [my_host_dev]
ok: [my_host_prod]
TASK [Restart Apache webserver] ************************************************
changed: [my_host_dev]
changed: [my_host_prod]
PLAY [Transfer index.html to the Webserver] ************************************
TASK [setup] *******************************************************************
ok: [my_host_prod]
ok: [my_host_dev]
TASK [template] ****************************************************************
ok: [my_host_prod]
ok: [my_host_dev]
PLAY RECAP *********************************************************************
my_host_dev                : ok=5    changed=1    unreachable=0    failed=0
my_host_prod               : ok=5    changed=1    unreachable=0    failed=0
The output shows the particular subtasks performed one after another. In the one single command, we installed Apache2 webserver and replaced the original index.html page with the most recent version of a template that was stored on our harddisk. In other words, this command turns a plain VM into a running webserver that leverages dynamic content specified by ourselves.
The commands presented in this tutorial use a simple syntax and make use of Ansibles’ modules. Modules capsule a wide variety of common tasks and can turn a long and error-prone manual set-up process into triggering just one command. Ansible is very easy to set up and allows us to manage the usual configuration tasks of VMs in a very short time.


